EtcdUI Service
After the EII Configuration Management (a_configmgr_agent) service is successfully up, ETcd web UI is accessed with the following steps. Configuration changes are made for respective EII container services.
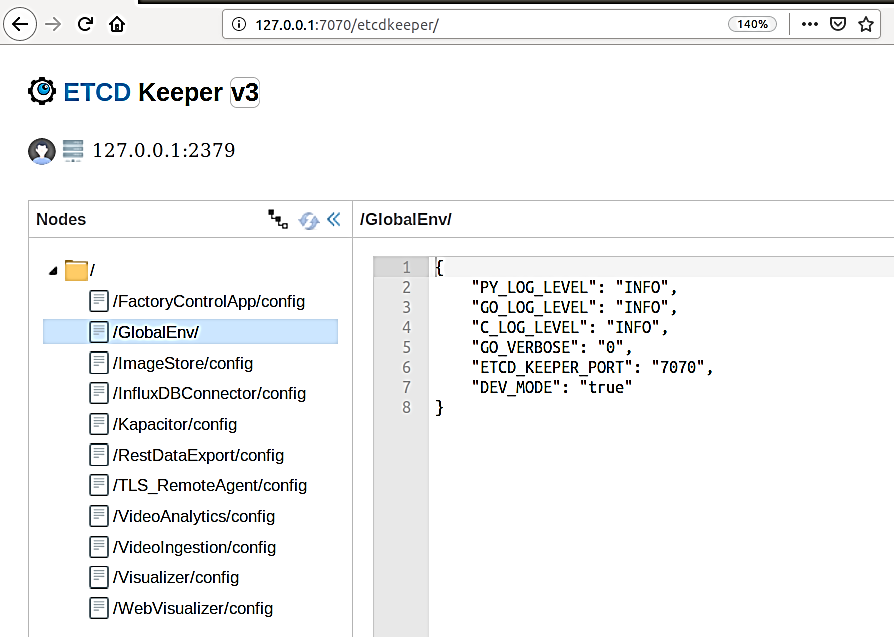
Open the browser and enter the address: https://$(HOST_IP):7071/etcdkeeper/ (when EII is running in secure mode). In this case, CA cert has to be imported in the browser. For insecure mode i.e. DEV mode, it can be accessed at https://$(HOST_IP):7071/etcdkeeper/.
Click on the version of the title to select the version of ETcd. By default the version is V3. Reopening will remember user’s choice.
Right-click on the tree node to add or delete.
For secure mode, authentication is required. User name and password needs to be entered in the dialogue box.
Username is the ‘root’ and default password is located at ETCDROOT_PASSWORD key under environment section in docker-compose.yml(
[WORK_DIR]/IEdgeInsights/ConfigMgrAgent/docker-compose.yml)This service is accessed from a remote system at address: https://$(HOST_IP):7071 (when EII is running in secure mode). In this case, CA cert has to be imported in the browser. For insecure mode i.e. DEV mode, it is accessed at http://$(HOST_IP):7071
If ETCDROOT_PASSWORD is changed, there must be consolidated docker-compose.yml generated using builder script and EII must to be provisioned again. Run the following commands:
cd [WORKDIR]/IEdgeInsights/build
python3 builder.py -f usecases/<usecase.ml>
docker-compose up -d ia_configmgr_agent
The ETCD watch capability is enabled for video and timeseries services. It will auto-restart microservices when microservices config/interface changes are done via the EtcdUI interface. Any changes done to these keys are reflected at runtime in EII.
For changes done to any other keys, the EII stack needs to be restarted to be effective. Run the following commands in the working directory, to build or restart EII:
cd [WORKDIR]/IEdgeInsights/build
docker-compose down
docker-compose up -d
Refer prerequisites for video accelerators and prerequisities for cameras before changing the configuration dynamically through ETcdUI.
Steps to Independently Build and Deploy ETcdUI Service
Note
For running two or more microservices, it is recommended that the users try the use case-driven approach for building and deploying as mentioned in Generate Consolidated Files for a Subset of Edge Insights for Industrial Services
Steps to Independently Build EtcdUI Service
Note
When switching between independent deployment of the service with and without config manager agent service dependency, one would run into issues with docker-compose build w.r.t Certificates folder existence. As a workaround, run command sudo rm -rf Certificates to proceed with docker-compose build.
To independently build EtcdUI service, complete the following steps:
The downloaded source code should have a directory named EtcdUI:
cd IEdgeInsights/EtcdUI
Copy the IEdgeInsights/build/.env file using the following command in the current folder
cp ../build/.env .
NOTE: Update the HOST_IP and ETCD_HOST variables in the .env file with your system IP.
# Source the .env using the following command:
set -a && source .env && set +a
Independently build:
docker-compose build
Steps to Deploy EtcdUI Service
Deploy EtcdUI Service with Config Manager Agent Dependency
Run the following commands to deploy EtcdUI service with Config Manager Agent dependency:
Note
Ensure that the Config Manager Agent image present in the system. If not, build the Config Manager Agent locally when independently deploying the service with Config Manager Agent dependency.
# Enter the EtcdUI directory
cd IEdgeInsights/EtcdUI
Copy the IEdgeInsights/build/.env file using the following command in the current folder, if not already present.
cp ../build/.env .
Note
Ensure that docker ps is clean and docker network ls must not have EII bridge network.
Update .env file for following:
    1. HOST_IP and ETCD_HOST variables with your system IP.
    2. `READ_CONFIG_FROM_FILE_ENV` value is set to `false`.
Copy the docker-compose.yml of IEdgeInsights/ConfigMgrAgent as docker-compose.override.yml in IEdgeInsights/EtcdUI.
cp ../ConfigMgrAgent/docker-compose.yml docker-compose.override.yml
Copy the builder.py with standalone mode changes in IEdgeInsights/EtcdUI.
cp ../build/builder.py .
Note
: Run the builder.py in standalone mode, this will generate eii_config.json and update docker-compose.override.yml
python3 builder.py -s true
Building the service (This step is optional for building the service if not already done in the
Independently buildablestep previously)
docker-compose build
Running the service
Note: Source the .env using the command
set -a && source .env && set +abefore running the below command.
docker-compose up -d
Steps to Add Self Signed Certificate as Trusted in local Browser
Go to Build Directory of the repo
cd <workdir>/IEdgeInsights/build/Certificates/EtcdUI/
Download Root CA Cert from the EtcdUI

- Import the RootCA certificates as Trusted Root Certificate in browser
For Chrome Browser, Follow the below steps
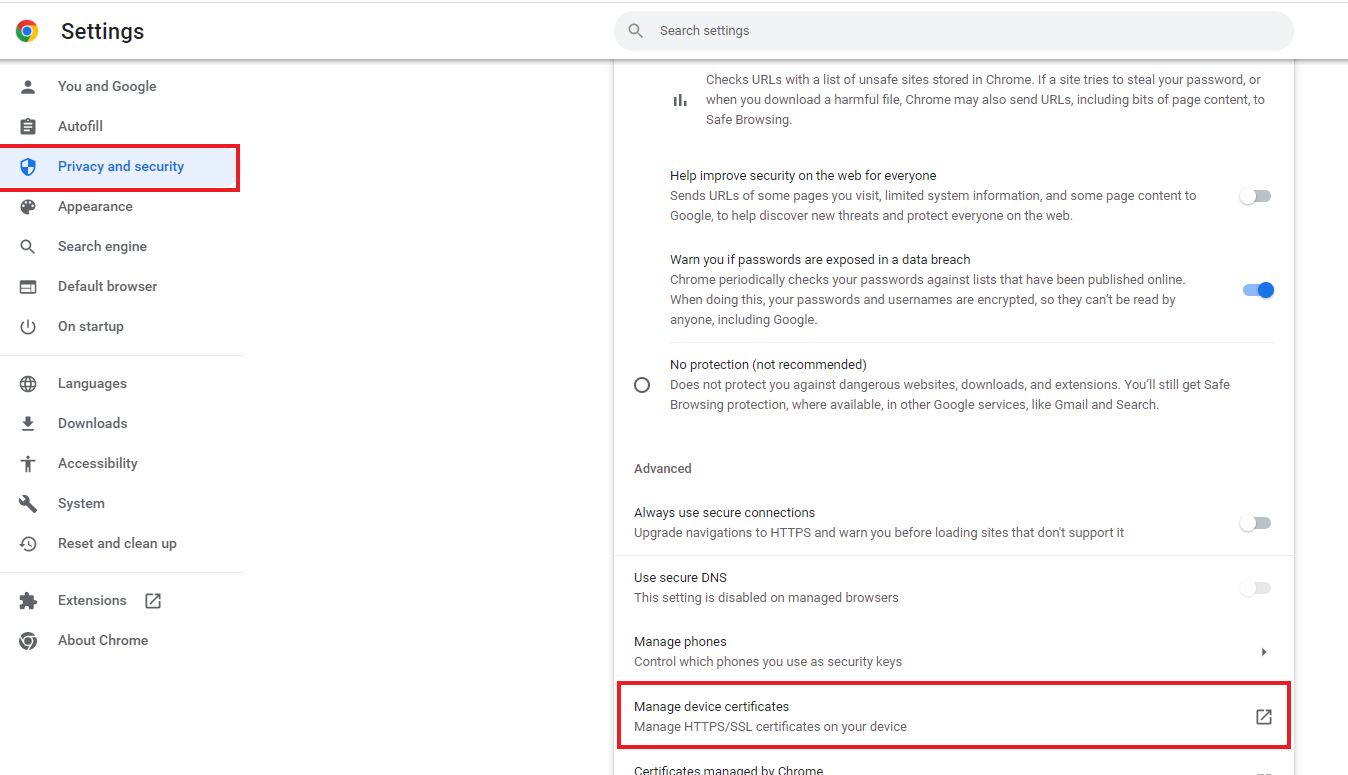
Open Chrome settings, scroll to the bottom, and click Privacy and security
Click Manage devices certificates…
Click the Trusted Root Certification Authorities tab, then click the Import… button. This opens the Certificate Import Wizard. Click Next to get to the File to Import screen.
Click Browse… and under File Type select All Files and select the certificate file you saved earlier, then click Next.

Select Place all certificates in the following store. The selected store should be Trusted Root Certification Authorities. If it isn’t, click Browse… and select it. Click Next and Finish
Click Yes on the security warning.
Restart Chrome.


