Contents
Web Deployment Tool Front End Overview
Web Deployment Tool (WDT) provides a graphical interface to configure Video and Time series analytics pipeline by adding dragging and dropping required modules, configuring the User Defined Functions (UDFs), previewing the output in the Visualizer app and doing the deployment of EII stack on another ndoe in DEV or PROD mode.
With respect to Video Analytics pipeline, we have two offerrings:
VideoIngestion/VideoAnalytics (VI/VA) based
EdgeVideoAnalyticsMicroservice(EVAM) based Where VI/VA and EVAM are mutually exclusive.
The Web Deployment Tool backend details are accessible at DeploymentToolBackend/README.md in the EII codebase
Prerequisites
Complete the following prerequisites before using the Web Deployment tool:
Install the prerequisites for running EII. For more details, refer to the EII ReadMe.
Configuration
The front end server runs on the port value that you enter for the env variable PORT in the docker-compose.yml file. Based on the value for the env variable dev_mode in the docker-compose.yml file, the front-end server will run in the DEV mode (http/insecure) or the PROD mode (https/secure). By default, the PROD mode is enabled. The following code snippet shows the default value for the env variable env_mode:
dev_mode: "false"
Run the Web Deployment Tool Front End
This section provides details for running the Web Deployment Tool for various scenarios.
Run the Container without Building
To run the container without building it, run the following commands:
cd [WORKDIR]/IEdgeInsights/DeploymentToolFrontend
./run.sh
Build and Run Container
To build and run the container, run any of the following commands:
./run.sh --build
or
./run.sh -b
To build and run with --no-cache or to provide any other build argument, append the build arguement after the previous commands. For example:
./run.sh --build --no-cache
Restart the Container
To restart the container, run any of the following commands:
./run.sh --restart
or
./run.sh -r
Bring Down the Container
To bring down the container, run any of the following commands:
./run.sh --down
or
./run.sh -d
Running Front End and Backend on Different Machines
If you want to run the front end on another machine, follow these steps:
Modify the
docker-compose.ymlfile as follows:DEPLOYMENT_TOOL_BACKEND_HOST: <backend-machine-ip> VISUALIZER_HOST: <backend-machine-ip> Add the above IP to no_proxy, if needed
no_proxy: ${eii_no_proxy},<backend-machine-ip>
NO_PROXY: ${eii_no_proxy},<backen-machine-ip>
Copy the certificates from remote backend machine (DeploymentToolBackend/certificates/) into front end machine (DeploymentToolFrontend/certificates/)
Re-run the front end
./run.sh -b
Uninstall Web Deployment Tool Front End
To completely remove the Web Deployment Tool Frontend and other files created on the host machine by the tool, run the uninstall.sh script:
./uninstall.sh
Web Deployment Tool Workflow
This section provides details for how to use the Web Deployment Tool (WDT) to configure and deploy video streams using the front end of the WDT.
Start the Front End Server
After the ./run.sh file runs, it may take 30 seconds for the front-end server to come up. You may need to wait longer if you are running the tool for the first time. You can run the following command to view the logs and check if the front-end server is up:
docker logs -f deployment_tool_frontend
Log in to the Web Deployment Tool
After you start the front-end server and when the log shows the "Starting the development server..." message, complete the following steps to log in to the WDT front end:
From a browser, go to http(s)://<host-ip>:<host-port>
For example, for the
PROD modego to:https://127.0.0.1:3100 For the ``DEV mode``\ , go to:
http://127.0.0.1:3100
Note: Currently the Web Deployment Tool is supported only on the Google Chrome browser. When you launch the Web Deployment Tool on ubuntu machine browser, make sure proxy is updated in the browser settings while working behind proxy network.
On the Sign in page, enter your user credentials and click Sign in.
Note: To log in, use the credentials mentioned in the
creds.jsonfile in theDeploymentToolBackendrepo. For more details, refer to the ReadMe Ensure that the front end and the back end are running in the same mode (DEV mode or PROD mode). By default, the front end and the back end are configured to run in thePRODmode.
Configure and Deploy Video and Time series analytics use case
After you sign in to the WDT, complete the following steps to configure and deploy the video streams:
In the Create or select a project section, select Create a new project.
In the Project name field, enter the name of the project.
From the Number of datastreams list, select the required number of datastreams. ..
Note: Currently WDT supports maximum of 6 streams or instances.
Click Next.
On the Configure & Build page, in the Data Streams, view the layout of the use case.
If required, on the left pane, from the Components List, drag and drop the required components to the data stream. This will add the component and video stream to the use case layout. ..
Note: The new stream is added as a Video Ingestion and Video Analytics pair (VI-VA pair). In the current version of WDT, the VI only use case is not supported.
If required, to remove a component, click and select the component and then press the Delete key on the keyboard. ..
Note: If you delete a stream, then only the last stream that was added gets deleted, irrespective of the stream that is selected. This is due to a limitation in the platform.
If required, from the Settings section, change the settings for the component.
For EVAM, you can select only the pipelines given in the dropdown in settings.
If required to remove any of UDF from the component, click on close button X in the UDFs section of Settings
Click Save.
If required, you can configure the VI to use camera as an
ingestor(to receive camera input). If required, to optimize the output preview you can adjust the camera settings on the fly from the Test screen. ..Note: In the current version of WDT, the camera adjustment is supported only for the USB cameras. Also, for other camera types, if you need to do additional configuration for that device to work then you must do it manually on the platform.
If required, to add an algorithm or User Defined Function (UDF) to the config, from the Components List, click Import UDF.
On the Import UDF screen, browse and select the required UDF. ..
Note: a. To import a new UDF that doesn’t exist in the common/video/udfs folder manually copy it to the udfs folder. As of now, only the Python UDFs are supported to import via the Import UDF functionality.
On the Add to section, select the required component.
Click Import.
On the Configure & Build screen, after completing the configuration, in the Build section, click Start. ..
Note: The progress bar indicates the progress of the build. In case you need to cancel the build, click on the Cancel button next to the progress bar. If the build fails, click Start to retry the build. You can check the build failure reason by checking the build logs. To view the build logs, click View Logs. User can select the ‘Enable Auto Refresh’ option to refresh the logs. The logs are refreshed every 5 seconds.
After completing the build 100 percent, click the Next.
On the Test screen, for Time Series Usecase, click on MultiModalVisualization to open Graphana in new tab.
On the Testscreen, to preview the output from VA for a data stream, click and select the required Video Analytics component. ..
Note: When you click a VI or VA component, the settings associated to the selected component is displayed in the Settings* section. You can view settings such as **Camera Settings, Pipeline Settings, and UDF settings.
On the Testscreen, to preview the output from EVAM for a data stream, click and select the required EdgeVideoAnalyticsMicroservice component. ..
Note: Currently we are not supporting EVAM with camera and camera settings will not be available for EVAM
If required, update the settings, and click Save & Restart. This will save the changes to setting and restart the containers and you can view the updated output.You can view the preview in full screen by double clicking on the preview pane.
If you have configured a USB camera in VI, then you can view and adjust the camera controls from the Camera Settings section. You can make the setting changes the fly and view the preview. ..
Note: On low end machines the camera control adjustments may not be fast enough. Note: EVAM release base validation only covered, USB Basler required few manual changes required and Camera Setting not integrated.
If required, you can click Back to go to the Configure & Build screen. You can also go to the Project screen and click Cancel to cancel the current project and choose another project.
After checking the preview, on the Test screen, click Next. ..
Note: WDT runs on Dev mode until Test screen, you can deploy Dev or Prod Mode in deploy section.
On the Deploy screen, to deploy on a local machine, in the Target Machine section, select Local Machine.
In the Deployment Mode section, select the required deployment mode (Dev or Prod mode) and then, click Deploy.
To deploy on a remote machine, from the Target Machine section, select Remote Machine.
From the Deployment Mode section, select the required deployment mode (DEV or PROD mode). ..
Note: Before you start the deployment, ensure that the specified directory in the remote machine is empty. Also, ensure that the remote machine has all the pre-requisites for EII already installed. Otherwise, the deployment might fail.
- In the Remote Machine Detail section, enter the ip address of remote machine,username,password and directory path and,click
Deploy.
Note: After the deployment is triggered or done, you cannot go back to the Test screen or the Configure screen. In case you need to cancel the deployment, click on the Cancel button next to the progress indicator. You can also click Sign out to sign out or click Cancel button in the end pane, to go to the Project selection screen. Note :
Ensure docker and docker compose tools are installed in remote machine before triggering remote deployment
- In case of EVAM Use case, create a empty folder named EdgeVideoAnalyticsMicroservice inside the specified directory(directory specified in remote deployment form field) on the remote machine and
ensure to copy the EVAM resources and eii/pipelines folder from
/IEdgeInsights/EdgeVideoAnalyticsMicroservice directory to newly created EdgeVideoAnalyticsMicroservice in remote machine after triggering remote deployment
Execute the following commands to bring up the services:
```shell
docker-compose down
docker-compose up -d
```
On the Deployment Successful dialog, click Close.
Bring Up the Containers in remote machine
To bring up the front-end containers in the remote machine, complete the deployment, and then, log in to the remote machine. Go to the build directory (under the directory that was specified while deploying). By Default DEV_MODE is set to true, user can change manually in the build/.env accordingly and run the following commands:
./source.sh
docker-compose up -d
Note
It may take several minutes for the front end to come up if you are building and running WDT on a fresh machine.
Steps to Add Self Signed Certificate as Trusted in Local Browser
cd
Download Root CA Cert from the certificates under DeploymentToolFrontend

- Import the RootCA certificates as Trusted Root Certificate in browser
For Chrome Browser, run the following steps
i. Open Chrome settings, scroll to the end, and click **Privacy and security** <br /> ii. Click **Manage devices certificates...** <br /> 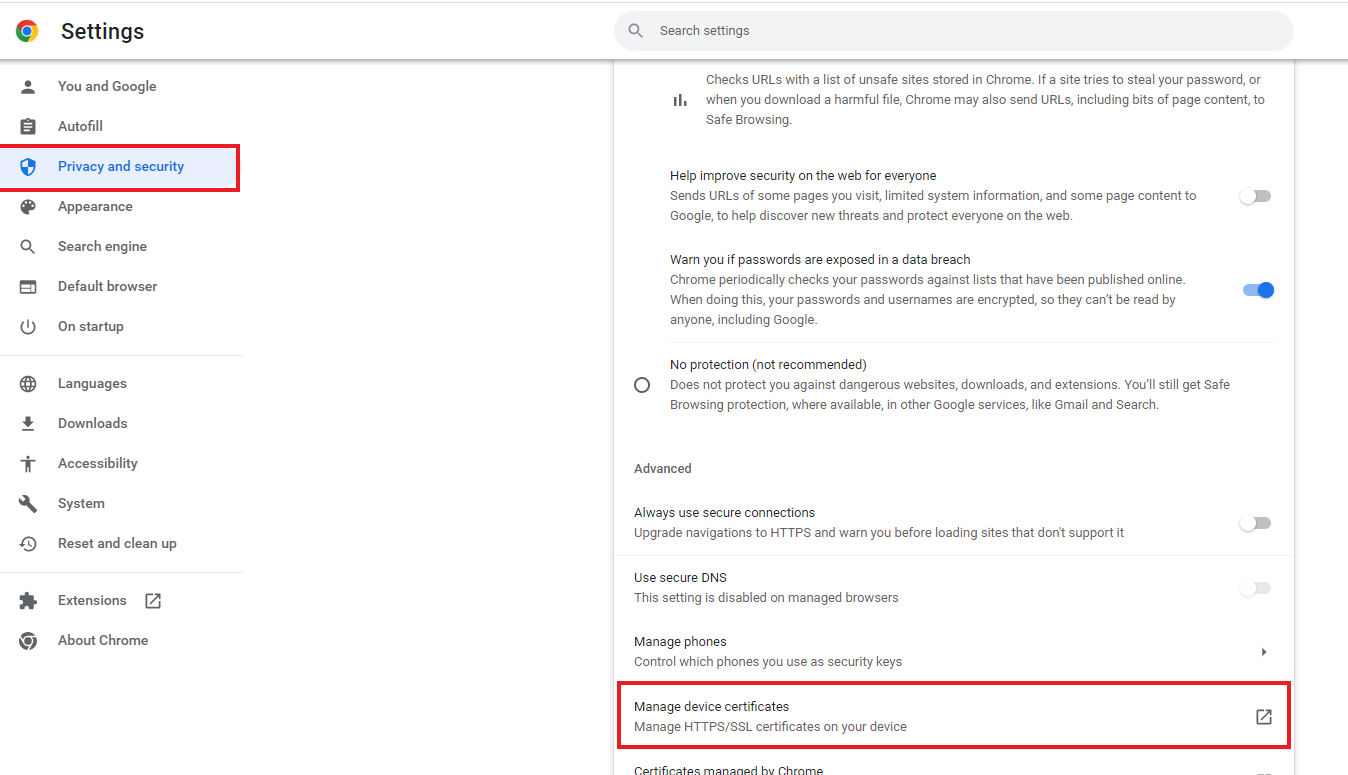 <br /> iii. Click the **Trusted Root Certification Authorities** tab, then click the **Import...** button. This opens the Certificate Import Wizard. Click **Next** to get to the **File to Import** screen. <br /> iv. Click **Browse...** and under File Type select All Files and select the certificate file you saved earlier, then click **Next**. <br /> 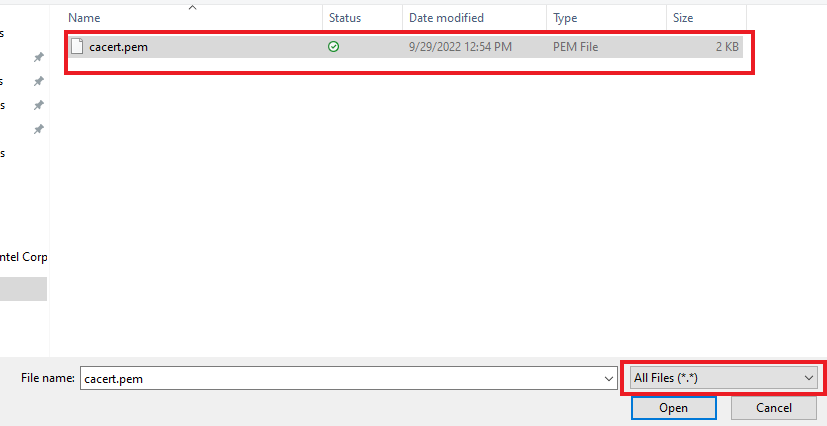 <br /> v. Select **Place all certificates in the following store**. The selected store should be **Trusted Root Certification Authorities**. If it isn't, click **Browse...** and select it. Click **Next** and **Finish** <br /> vi. Click **Yes** on the security warning. <br /> vii. Restart Chrome.<br />- Import the RootCA certificates as Trusted Root Certificate in browser
