Working with Video Data
VideoIngestion Module
The VideoIngestion (VI) module ingests the video frames from video sources in the Open Edge Insights for Industrial (Open EII) stack for processing. The example of video sources include video files or cameras such as Basler, RTSP, or USB cameras. The VI module can also perform video analytics, when it runs with the classifier and post-processing user defined functions (UDFs).
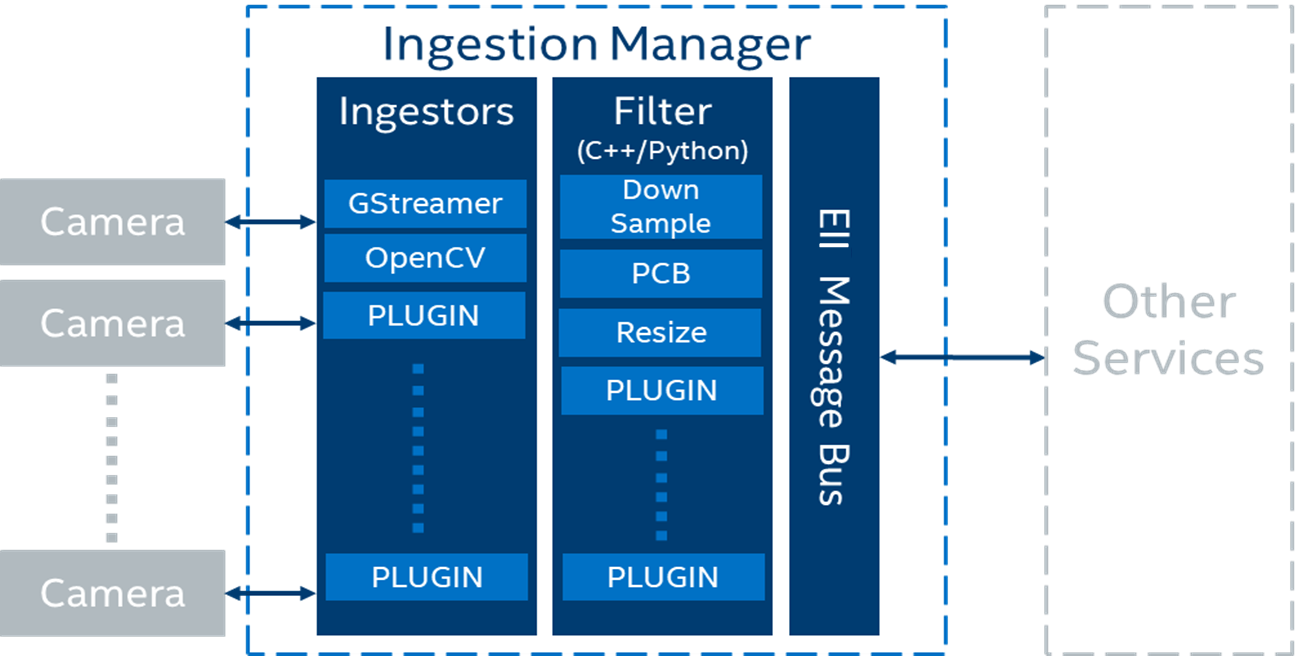
The high-level logical flow of the VideoIngestion pipeline is as follows:
The app reads the application configuration via the Configuration Manager which has details of the
ingestor,encoding, andUDFs.Based on the ingestor configuration, the app reads the video frames from a video file or camera.
[
Optional] The read frames are passed to one or more chained native or python UDFs for doing any pre-processing. Passing through UDFs is optional and it is not required to perform any pre-processing on the ingested frames. With chaining of UDFs supported, you also have classifier UDFs and any post-processing UDFs like resize etc., configured in theudfskey to get the classified results. For more details, refer to the ../common/video/udfs/README.md.App gets the msgbus endpoint configuration from system environment. Based on the configuration, the app publishes data on the mentioned topic on the MessageBus.
Note
The following use cases are suitable for a single node deployment, where the overhead of the VideoAnalytics (VA) service can be avoided:
The VA service is not required, when the VI service is configured with a UDF that does the classification. The VI service uses multiple UDFs for pre-processing, classification, and post-processing.
The VA service is not required, when the VI service uses the Gstreamer Video Analytics (GVA) elements. Pre-processing, classification, and post-processing (using the vappi gstreamer elements) can be done in the gstreamer pipeline. If required, you can configure post-processing by having multiple UDFs in the VI service.
Configuration
For configuration details refer to the following topics:
MessageBus configuration respectively.
JSON schema(
[WORK_DIR]/IEdgeInsights/VideoIngestion/schema.json)
All the app module configurations are added to the distributed key-value store under the AppName env, as mentioned in the environment section of the app’s service definition in the docker-compose. If the AppName is VideoIngestion, then the app’s config is taken from the /VideoIngestion/config key via the Open EII Configuration Manager.
Note
The Developer mode-related overrides go in the
docker-compose-dev.override.ymlfile.For the
jpegencoding type,levelis the quality from0 to 100. A higher value means better quality.For the
pngencoding type,levelis the compression level from0 to 9. A higher value means a smaller size and longer compression time.Use the JSON validator tool for validating the app configuration for the schema.
Ingestor Config
Open EII supports the following type of ingestors:
For more information on the Intel RealSense SDK, refer to librealsense.
VideoIngestion Features
Refer the following to learn more about the VideoIngestion features and supported camera:
Image Ingestion
The Image ingestion feature is responsible for ingesting the images coming from a directory into the Open EII stack for further processing. The OpenCV Ingestor supports image ingestion.
Image ingestion supports the following image formats:
Jpg
Jpeg
Jpe
Bmp
Png
Refer the following snippet for configuring the config.json([WORK_DIR]/IEdgeInsights/VideoIngestion/config.json) file for enabling the image ingestion feature.
OpenCV Ingestor
{
 //
  "ingestor": {
  "type": "opencv",
  "pipeline": "/app/img_dir/",
  "poll_interval": 2,
  "loop_video": true,
  "image_ingestion": true
},
  "sw_trigger": {
      "init_state": "running"
  },
  "max_workers":1,
    //
}
The description of the keys used in the config.json file is as follows:
pipeline — Provides the path to the images directory that is volume mounted.
poll_interval — Refers to the pull rate of image in seconds. Configure the
poll_intervalvalue as required.loop_video — Would loop through the images directory.
image_ingestion — Optional boolean key. It is required to enable the image ingestion feature.
Note:
The image_ingestion key in the
config.jsonneeds to be set true for enabling the image ingestion feature.Set the
max_workersvalue to 1 as"max_workers":1in theconfig.jsonfiles for VideoIngestion/config.json([WORK_DIR]/IEdgeInsights/VideoIngestion/config.json) and VideoAnalytics/config.json([WORK_DIR]/IEdgeInsights/VideoAnalytics/config.json). This is to ensure that the images sequence is maintained. If themax_workersis set more than 1, then more likely the images would be out of order due to those many multiple threads operating asynchronously.If the resolution of the image is greater than
1920×1200, then the image will be resized towidth = 1920andheight = 1200. The image is resized to reduce the loading time of the image in the Web Visualizer and the native Visualizer.
Volume mount the image directory present on the host system. To do this, provide the absolute path of the images directory in the docker-compose file.
Refer the following snippet of the ia_video_ingestion service to add the required changes in the docker-compose.yml([WORK_DIR]/IEdgeInsights/VideoIngestion/docker-compose.yml) file. After making the changes, ensure that the builder.py([WORK_DIR]/IEdgeInsights/build/builder.py) is executed before you build and run the services.
ia_video_ingestion:
  ...
  volume:
    - "vol_eii_socket:${SOCKET_DIR}"
    - "/var/tmp:/var/tmp"
    # Add volume
    # Please provide the absolute path to the images directory present in the host system for volume mounting the directory. Eg: -"home/directory_1/images_directory:/app/img_dir"
    - "<path_to_images_directory>:/app/img_dir"
    ...
UDF Configurations
Ensure that you are using the appropriate UDF configuration for all the video and camera streams. If the UDF is not compatible with the video source, then you may not get the expected output in the Visualizer or the Web Visualizer screen. Use the dummy UDF, if you are not sure about the compatibility of the UDF and a video source. The dummy UDF will not do any analytics on the video, and it will not filter any of the video frames. You will see the video streamed by the camera, as it is displayed on the video output screen in the Visualizer or Web Visualizer.
Refer the following configuration for the
dummyUDF:
"udfs": [{
    "name": "dummy",
    "type": "python"
}]
>
Apply the same changes in the VideoAnalytics configuration if it is subscribing to VideoIngestion.
Updating Security Context of VideoIngestion Helm Charts
Complete the following steps to update Helm charts to enable K8s environment to access or detect Basler Camera, USB devices, and NCS2 Devices:
#. Open the EII_HOME_DIR/IEdgeInsights/VideoIngestion/helm/templates/video-ingestion.yaml file
#.
Update the following security context snippet
securityContext:
  privileged: true
in the yaml file as:
...
...
...
    imagePullPolicy: {{ $global.Values.imagePullPolicy }}
    securityContext:
      privileged: true
    volumeMounts:
    - name: dev
      mountPath: /dev
...
Rerun the
builder.pyto apply these changes to your deployment Helm charts.
Camera Configurations
The camera configurations for the VI module are as follows:
For a video file:
OpenCV Ingestor
{
  "type": "opencv",
  "pipeline": "./test_videos/pcb_d2000.avi",
  "poll_interval": 0.2
  "loop_video": true
}
Gstreamer Ingestor
{
  "type": "gstreamer",
  "pipeline": "multifilesrc loop=TRUE stop-index=0 location=./test_videos/pcb_d2000.avi ! h264parse ! decodebin ! videoconvert ! video/x-raw,format=BGR ! appsink"
}
For more information or configuration details for the multifilesrc element, refer to the docs/multifilesrc_doc.md.
GenICam GigE or USB3 Cameras
For more information or configuration details for the GenICam GigE or the USB3 camera support, refer to the GenICam GigE/USB3.0 Camera Support.
Prerequisites for Working with the GenICam Compliant Cameras
The following are the prerequisites for working with the GeniCam compliant cameras.
Note
For other cameras such as RealSense, RSTP, and USB (v4l2 driver compliant) revert the changes that are mentioned in this section. Refer to the following snip of the ia_video_ingestion service, to add the required changes in the docker-compose.yml([WORK_DIR]/IEdgeInsights/VideoIngestion/docker-compose.yml) file of the respective ingestion service (including custom UDF services). After making the changes, before you build and run the services, ensure to run the builder.py([WORK_DIR]/IEdgeInsights/build/builder.py).
For GenICam GigE cameras:
ia_video_ingestion:
  # Add root user
  user: root
  # Add network mode host
  network_mode: host
  # Please make sure that the above commands are not added under the environment section and also take care about the indentations in the compose file.
  ...
  environment:
  ...
    # Add HOST_IP to no_proxy and ETCD_HOST
    no_proxy: "${RTSP_CAMERA_IP},<HOST_IP>"
    ETCD_HOST: "<HOST_IP>"
  ...
  # Comment networks section as below as it will throw an error when network mode host is used.
  # networks:
    # - eii
  # Comment ports section as below
  # ports:
  # - 64013:64013
For GenIcam USB3.0 cameras:
ia_video_ingestion:
  # Add root user
  user: root
  ...
  environment:
    # Refer [GenICam GigE/USB3.0 Camera Support](/3.0.1/IEdgeInsights/VideoIngestion/docs/generic_plugin_doc.html) to install the respective camera SDK
    # Setting GENICAM value to the respective camera/GenTL producer which needs to be used
    GENICAM: "<CAMERA/GenTL>"
  ...
Note
If the GenICam cameras do not get initialized during the runtime, then on the host system, run the
docker system prunecommand. After that, remove the GenICam specific semaphore files from the/dev/shm/path of the host system. Thedocker system prunecommand will remove all the stopped containers, networks that are not used (by at least one container), any dangling images, and build cache which could prevent the plugin from accessing the device.If you get the
Feature not writablemessage while working with the GenICam cameras, then reset the device using the camera software or using the reset property of the Generic Plugin. For more information, refer the README.In the
IPCmode, if the Ingestion service is running with therootprivilege, then theia_video_analyticsandia_visualizerservice subscribing to it must also run with therootprivileges.In a multi-node scenario, replace
in “no_proxy” with the leader node’s IP address. In the TCP mode of communication, the msgbus subscribers and clients of VideoIngestion are required to configure the
Endpointin theconfig.jsonfile with the host IP and port under theSubscribersorClientsinterfaces section.
Gstreamer Ingestor
GenICam GigE/USB3.0 cameras
{
  "type": "gstreamer",
  "pipeline": "gencamsrc serial=<DEVICE_SERIAL_NUMBER> pixel-format=<PIXEL_FORMAT> exposure-time=5000 exposure-mode=timed exposure-auto=off throughput-limit=300000000 ! videoconvert ! video/x-raw,format=BGR ! appsink"
}
Note:
Generic Plugin can work only with GenICam compliant cameras and only with gstreamer ingestor.
The above gstreamer pipeline was tested with Basler and IDS GigE cameras.
If
serialis not provided then the first connected camera in the device list will be used.If
pixel-formatis not provided then the defaultmono8pixel format will be used.If
widthandheightproperies are not set then gencamsrc plugin will set the maximum resolution supported by the camera.By default
exposure-autoproperty is set to on. If the camera is not placed under sufficient light then with auto exposure,exposure-timecan be set to very large value which will increase the time taken to grab frame. This can lead toNo frame received error. Hence it is recommended to manually set exposure as in the below sample pipline when the camera is not placed under good lighting conditions.throughput-limitis the bandwidth limit for streaming out data from the camera(in bytes per second).
Hardware trigger based ingestion with Gstreamer ingestor
{
"type": "gstreamer",
"pipeline": "gencamsrc serial=<DEVICE_SERIAL_NUMBER> pixel-format=<PIXEL_FORMAT> trigger-selector=FrameStart trigger-source=Line1 trigger-activation=RisingEdge hw-trigger-timeout=100 acquisition-mode=singleframe exposure-time=5000 exposure-mode=timed exposure-auto=off throughput-limit=300000000 ! videoconvert ! video/x-raw,format=BGR ! appsink"
}
Note:
For PCB use case, use the
widthandheightproperties of gencamsrc to set the resolution to1920x1200and make sure it is pointing to the rotating PCB boards, as seen in thepcb_d2000.avivideo file for the PCB filter to work.
Refer the following example pipeline:
{
  "type": "gstreamer",
  "pipeline": "gencamsrc serial=<DEVICE_SERIAL_NUMBER> pixel-format=ycbcr422_8 width=1920 height=1200 exposure-time=5000 exposure-mode=timed exposure-auto=off throughput-limit=300000000 ! videoconvert ! video/x-raw,format=BGR ! appsink"
}
Refer to the docs/basler_doc.md for more information/configuration on Basler camera.
RTSP Cameras
Refer to the docs/rtsp_doc.md for information/configuration on RTSP camera.**
OpenCV Ingestor
{
  "type": "opencv",
  "pipeline": "rtsp://<USERNAME>:<PASSWORD>@<RTSP_CAMERA_IP>:<PORT>/<FEED>"
}
Note: OpenCV for RTSP will use software decoders.
Gstreamer Ingestor
{
  "type": "gstreamer",
  "pipeline": "rtspsrc location=\"rtsp://<USERNAME>:<PASSWORD>@<RTSP_CAMERA_IP>:<PORT>/<FEED>\" latency=100 ! rtph264depay ! h264parse ! vaapih264dec ! vaapipostproc format=bgrx ! videoconvert ! video/x-raw,format=BGR ! appsink"
}
Note: The RTSP URI of the physical camera depends on how it is configured using the camera software. You can use VLC Network Stream to verify the RTSP URI to confirm the RTSP source.
For RTSP simulated camera using cvlc
OpenCV Ingestor
{
  "type": "opencv",
  "pipeline": "rtsp://<SOURCE_IP>:<PORT>/<FEED>"
}
Gstreamer Ingestor
     {
       "type": "gstreamer",
       "pipeline": "rtspsrc location=\"rtsp://<SOURCE_IP>:<PORT>/<FEED>\" latency=100 ! rtph264depay ! h264parse ! vaapih264dec ! vaapipostproc format=bgrx ! videoconvert ! video/x-raw,format=BGR ! appsink"
     }

**Refer `docs/rtsp_doc.md </3.0.1/IEdgeInsights/VideoIngestion/docs/rtsp_doc.html>`_ for more information/configuration on rtsp simulated camera.**
USB v4l2 Cameras
For information or configurations details on the USB cameras, refer to docs/usb_doc.md.
OpenCV Ingestor
{
  "type": "opencv",
  "pipeline": "/dev/<DEVICE_VIDEO_NODE>"
}
Gstreamer Ingestor
{
  "type": "gstreamer",
  "pipeline": "v4l2src device=/dev/<DEVICE_VIDEO_NODE> ! video/x-raw,format=YUY2 ! videoconvert ! video/x-raw,format=BGR ! appsink"
}
RealSense Depth Cameras
RealSense Ingestor"ingestor": { "type": "realsense", "serial": "<DEVICE_SERIAL_NUMBER>", "framerate": <FRAMERATE>, "imu_on": true },
Note
RealSense Ingestor was tested with the Intel RealSense Depth Camera D435i.
RealSense Ingestor does not support poll_interval. If required, use framerate to reduce the ingestion frames per second (FPS).
If the
serialconfig is not provided then the first RealSense camera in the device list will be connected.If the
framerateconfig is not provided then the default framerate of30will be applied. Ensure that the framerate provided is compatible with both the color and depth sensor of the RealSense camera. With the D435i camera only framerate 6,15,30, and 60 is supported and tested.The IMU stream will work only if the RealSense camera model supports the IMU feature. The default value for
imu_onis set tofalse.
VideoAnalytics Module
Note
In this document, you will find labels of ‘Edge Insights for Industrial (EII)’ for file names, paths, code snippets, and so on. Consider the references of EII as Open Edge Insights for Industrial (Open EII). This is due to the product name change of EII as Open EII.
The VideoAnalytics module is mainly responsibly for running the classifier UDFs and doing the required inferencing on the chosen Intel(R) Hardware (CPU, GPU, VPU, HDDL) using openVINO.
The high-level logical flow of VideoAnalytics pipeline is as follows:
App reads the application configuration via Open EII Configuration Manager which has details of
encodingandudfs.App gets the msgbus endpoint configuration from system environment.
Based on above two configurations, app subscribes to the published topic/stream coming from VideoIngestion module.
The frames received in the subscriber are passed onto one or more chained native/python UDFs for running inferencing and doing any post-processing as required. For more information, refer to UDFs Readme.
The frames coming out of chained UDFs are published on the different topic/stream on Message Bus.
Configuration
MessageBus Configuration respectively.
JSON schema(
[WORK_DIR]/IEdgeInsights/VideoAnalytics/schema.json)
The
max_workersandudfsare configuration keys related to UDFs. For more details on UDF configuration, visit ../common/video/udfs/README.mdFor details on Etcd and MessageBus endpoint configuration, visit Etcd_Secrets_Configuration.
If the VideoAnalytics container consumes a lot of memory, then one of the suspects could be that Algo processing is slower than the frame ingestion rate. Hence a lot of frames are occupying RAM waiting to be processed. In that case user can reduce the high watermark value to acceptable lower number so that RAM consumption will be under control and stay stabilzed. The exact config parameter is called ZMQ_RECV_HWM present in docker-compose.yml(
[WORK_DIR]/IEdgeInsights/VideoAnalytics/docker-compose.yml). This config is also present in other types of container, hence user can tune them to control the memory bloat if applicable. The config snippet is pasted below:
ZMQ_RECV_HWM: "1000"
All the app module configuration are added into distributed key-value data store under AppName env as mentioned in the environment section of this app’s service definition in docker-compose.
Developer mode related overrides go to docker-compose-dev.override.yml([WORK_DIR]/IEdgeInsights/VideoAnalytics/docker-compose-dev.override.yml).
If AppName is VideoAnalytics, then the app’s config would be fetched from /VideoAnalytics/config key via Open EII Configuration Manager.
Note:
For
jpegencoding type,levelis the quality from0 to 100(the higher is the better).For
pngencoding type,levelis the compression level from0 to 9. A higher value means a smaller size and longer compression time.
Use the JSON validator tool for validating the app configuration against the above schema.
Update Security Context of VideoIngestion Helm Charts
Complete the following steps to update Helm charts to enable K8s environment to access or detect Basler cameras and NCS2 devices
#. Open the EII_HOME_DIR/IEdgeInsights/VideoAnalytics/helm/templates/video-analytics.yaml file.
#.
Update the following security context snippet
securityContext:
  privileged: true
in the yml file as:
...
...
...
    imagePullPolicy: {{ $global.Values.imagePullPolicy }}
    securityContext:
      privileged: true
    volumeMounts:
    - name: dev
      mountPath: /dev
...
Rerun
builder.pyto apply these changes to your deployment helm charts.
Video Pipeline Analytics
This section provides more information about working with the video pipeline.
Enable Camera-based Video Ingestion
For detailed description on configuring different types of cameras and filter algorithms, refer to the VideoIngestion/README.md.
Use Video Accelerators in Ingestion and Analytics Containers
Open EII supports running inference on CPU, GPU, MYRIAD (NCS2), and HDDL devices by accepting the device value (“CPU”|”GPU”|”MYRIAD”|”HDDL”),
part of the udf object configuration in the udfs key. The device field in the UDF config of udfs key in the VideoIngestion and VideoAnalytics
configs can be updated at runtime via EtcdUI([WORK_DIR]/IEdgeInsights/EtcdUI) interface, the VideoIngestion and VideoAnalytics
services will auto-restart.
For more details on the UDF config, refer common/udfs/README.md.
Note
There is an initial delay of up to ~30 seconds while running inference on GPU (only for the first frame) as dynamically certain packages get created during runtime.
To Run on the USB Devices
For actual deployment if USB camera is required then mount the device node of the USB camera for ia_video_ingestion service. When multiple USB cameras are connected to host machine, the required camera should be identified with the device node and mounted.
For example, mount the two USB cameras connected to the host machine with device node as video0 and video1.
ia_video_ingestion:
  ...
  devices:
    - "/dev/dri"
    - "/dev/video0:/dev/video0"
    - "/dev/video1:/dev/video1"
Note
/dev/dri is required for graphic drivers.
To Run on the MYRIAD Devices
Note
In the IPC mode, when publisher such as ia_video_ingestion, ia_video_analytics, or custom_udfs is running with the root user permissions then the subscribers such as ia_visualizer, ia_imagestore, or ia_influxdbconnector should also run as root.
At runtime, use the root user permissions to run inference on a MYRIAD device. To enable the root user at runtime in ia_video_ingestion, ia_video_analytics, or custom UDF services, add user: root in the respective docker-compose.yml file. Refer to the following example:
ia_video_ingestion:
  ...
  user: root
Note
In the IPC mode when publisher (example, ia_video_ingestion, ia_video_analytics, or custom_udfs) is running with the root user permissions then the subscribers (For example ia_visualizer, ia_imagestore, ia_influxdbconnectorm, ia_video_profiler etc.) should also run as root by adding user: root in the respective docker-compose.yml file.
To enable root user at runtime in ia_video_analytics or custom UDF services based on ia_video_analytics, set user: root in the respective docker-compose.yml file. Refer the following example:
ia_video_analytics:
  ...
  user: root
Troubleshooting Issues for the MYRIAD (NCS2) Devices
If the NC_ERROR occurs during device initialization of NCS2 stick then use the following workaround. Replug the device for the init, if the NCS2 devices fails to initialize during running Open EII. To check if initialization is successful, run **dmesg** and **lsusb** as follows:
lsusb | grep "03e7" (03e7 is the VendorID and 2485 is one of the productID for MyriadX)
dmesg > dmesg.txt
[ 3818.214919] usb 3-4: new high-speed USB device number 10 using xhci_hcd
[ 3818.363542] usb 3-4: New USB device found, idVendor=03e7, idProduct=2485
[ 3818.363546] usb 3-4: New USB device strings: Mfr=1, Product=2, SerialNumber=3
[ 3818.363548] usb 3-4: Product: Movidius MyriadX
[ 3818.363550] usb 3-4: Manufacturer: Movidius Ltd.
[ 3818.363552] usb 3-4: SerialNumber: 03e72485
[ 3829.153556] usb 3-4: USB disconnect, device number 10
[ 3831.134804] usb 3-4: new high-speed USB device number 11 using xhci_hcd
[ 3831.283430] usb 3-4: New USB device found, idVendor=03e7, idProduct=2485
[ 3831.283433] usb 3-4: New USB device strings: Mfr=1, Product=2, SerialNumber=3
[ 3831.283436] usb 3-4: Product: Movidius MyriadX
[ 3831.283438] usb 3-4: Manufacturer: Movidius Ltd.
[ 3831.283439] usb 3-4: SerialNumber: 03e72485
[ 3906.460590] usb 3-4: USB disconnect, device number 11
If you notice
global mutex initialization failedduring device initialization of NCS2 stick, then refer to the following link: https://www.intel.com/content/www/us/en/support/articles/000033390/boards-and-kits.htmlFor VPU troubleshooting, refer the following link: https://docs.openvinotoolkit.org/2021.4/openvino_docs_install_guides_installing_openvino_linux_ivad_vpu.html#troubleshooting
To run on the HDDL Devices
Complete the following steps to run inference on HDDL devices:
- Download the full package for OpenVINO toolkit for Linux version “2021 4.2 LTS”
(
OPENVINO_IMAGE_VERSIONused in build/.env([WORK_DIR]/IEdgeInsights/build/.env)) from the official website (https://software.intel.com/en-us/openvino-toolkit/choose-download/free-download-linux).
Refer to the following link to install OpenVINO on the hostsystem
OpenVINO install: https://docs.openvinotoolkit.org/2021.4/_docs_install_guides_installing_openvino_linux.html#install-openvino
Note: OpenVINO 2021.4 installation creates a symbolic link to the latest installation with file name as
openvino_2021instead ofopenvino. You can create a symbolic link with file name asopenvinoto the latest installation as follows:cd /opt/intel sudo ln -s <OpenVINO latest installation> openvino
Example: sudo ln -s openvino_2021.4.752 openvino
Uninstall the older versions of OpenVINO if it is installed on the host system.
Refer to the following link to configure HDDL with
rootuser rightsAfter completing the HDDL setup, run the following commands with
rootuser rights.source /opt/intel/openvino/bin/setupvars.sh $HDDL_INSTALL_DIR/bin/hddldaemon
Note
HDDL Daemon should run in a different terminal or in the background on the host system where inference performed.
HDDL use cases were tested on host system with Ubuntu 20.04 kernel 5.13.0-27-generic by configuring and running HDDL daemon with
rootuser rights.HDDL plugin can have the ION driver compatibility issues with some versions of the Ubuntu kernel. If there are compatibility issues, then ION driver may not be installed and hddldaemon will use shared memory. To work with shared memory in docker environment, configure and run HDDL with
rootuser rights.To check the supported Ubuntu kernel versions, refer to the OpenVINO-Release-Notes.
For actual deployment, mount only the required devices for services using OpenVINO with HDDL (
ia_video_analyticsoria_video_ingestion) indocker-compose.ymlfile.For example, mount only the Graphics and HDDL ion device for the
ia_video_anayticsservice. Refer to the following code snippet:
ia_video_analytics:
  ...
  devices:
          - "/dev/dri"
          - "/dev/ion:/dev/ion"
Troubleshooting Issues for the HDDL Devices
Check if the HDDL Daemon is running on the host machine. This is to check if the HDDL Daemon is using the correct version of OpenVINO libraries in build/.env(
[WORK_DIR]/IEdgeInsights/build/.env). Enable thedevice_snapshot_modetofullin$HDDL_INSTALL_DIR/config/hddl_service.configon the host machine to get the complete snapshot of the HDDL device.For troubleshooting the VPU-related issues, refer to the following link: https://docs.openvinotoolkit.org/2021.4/openvino_docs_install_guides_installing_openvino_linux_ivad_vpu.html#troubleshooting
For new features and changes from the previous versions, refer to the OpenVINO 2021.4 release notes from the following link: https://software.intel.com/content/www/us/en/develop/articles/openvino-relnotes.html
For more details on the Known issues, limitations, and troubleshooting, refer to the OpenVINO website from the following link: https://docs.openvinotoolkit.org/2021.4/index.html
To Run on Intel(R) Processor Graphics (GPU/iGPU)
At runtime, use the root user permissions to run inference on a GPU device. To enable root user at runtime in ia_video_ingestion, ia_video_analytics, or custom UDF services, add user: root in the respective docker-compose.yml file. Refer the following example:
ia_video_ingestion:
  ...
  user: root
To enable root user at runtime in ia_video_analytics or any of the custom UDF services based on ia_video_analytics, set user: root in the respective docker-compose.yml file.
For example, refer to the following:
ia_video_analytics:
  ...
  user: root
Note
In the IPC mode, when the publisher (example, ia_video_ingestion or ia_video_analytics) is running as root then the subscriber (For example ia_visualizer, ia_imagestore, ia_influxdbconnectorm, ia_video_profiler etc.) should also run as root by adding
user: rootin the respective docker-compose.yml file.If you get a
Failed to create plugin for device GPU/ clGetPlatformIDs errormessage, then check if the host system supports GPU device. Try installing the required drivers from OpenVINO-steps-for-GPU. Certain platforms like TGL can have compatibility issues with the Ubuntu kernel version. Ensure the compatible kernel version is installed.
Open EII UDFLoader
UDFLoader is a library providing APIs for loading and executing native and python UDFs.
Open EII Sample UDFs
Open Edge Insights for Industrial (Open EII) supports loading and executing of native (C++) and python UDFs. In here, you can find the sample native and python UDFs (User Defined Functions) to be used with Open EII components like VideoIngestion and VideoAnalytics. The UDFs can modify the frame, drop the frame and generate meta-data from the frame.
Note
In this document, you will find labels of ‘Edge Insights for Industrial (EII)’ for filenames, paths, code snippets, and so on. Consider the references of EII as Open EII. This is due to the product name change of EII as Open EII.
User Defined Function (UDF)
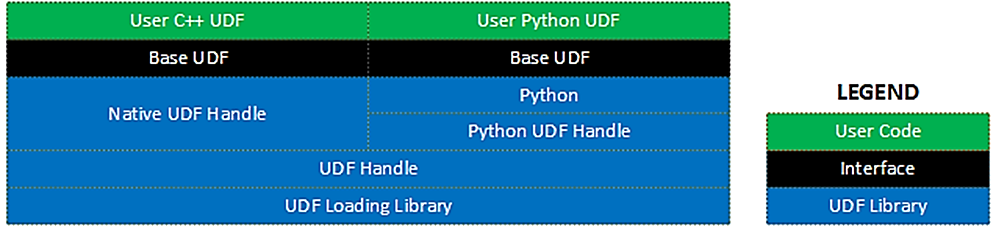
An UDF is a chunk of user code that acts as a filter, preprocessor, or classifier for a given data input coming from the Open EII. The User Defined Function (UDF) Loader Library provides a common API for loading C++ and Python UDFs.
The library itself is written in C++ and provides an abstraction layer for loading and calling UDFs. Additionally, the library defines a common interface inheritable by all UDFs (whether written in C++ or Python).
The overall block diagram for the library is shown in the following figure.
In this case, the VideoIngestion component is also able to execute the video data classifier algorithm by including the classifier UDF into the VideoIngestion configuration. By defining the Classifier UDF in the VideoIngestion component, the VideoAnalytics component become optional
Native Visualizer Module
Native Visualizer ia a native app to view the classified images or metadata coming out of Open Edge Insights for Industrial (Open EII).
Note
In this document, you will find labels of ‘Edge Insights for Industrial (EII)’ for file names, paths, code snippets, and so on. Consider the references of EII as Open EII. This is due to the product name change of EII as Open EII.
Steps to build and run visualizer
Please go through the below sections to have visualizer service built and launch it:
For more details, refer Open EII core README
Note
The admin has to make sure all the necessary config is set in etcd before starting the visualizer.
The user has to make sure the path provided in docker-compose volumes of visualizer correlates to the one in etcd before running visualizer if he wishes to save images.
Run this command in terminal if you run into tkinter couldn’t connect to display exception
```sh
xhost +
```
If the Visualizer UI doesn’t show up and if you notice couldn’t connect to display “:0” error in
docker logs -f ia_visualizer, please check the value forDISPLAYenv variable on the host machine by running cmd:env | grep DISPLAY, please set this as the value for theDISPLAYnv variable in the ia_visualizer service of docker-compose.yml([WORK_DIR]/IEdgeInsights/Visualizer/docker-compose.yml) or in the consolidated ../build/docker-compose.yml([WORK_DIR]/IEdgeInsights/build/docker-compose.yml) file and re-rundocker-compose up ia_visualizer -d
Example:
```sh
$ env | grep DISPLAY
DISPLAY:=1
```
Set ":=1" as `DISPLAY` env value in ia_visualizer service
If one needs to remove the classified images on a periodic basis:
Have this command running in a separate terminal as a cleanup task to remove images older than 60 mins in IMAGE_DIR. Replace <path-to-IMAGE_DIR> with IMAGE_DIR path given while running visualizer. The -mmin option can be changed accordingly by the user.
while true; do find <path-to-IMAGE_DIR> -mmin +60 -type f -name "*.png" -exec rm -f {} \;; done
If user needs to remove the bounding box:
Set the value of draw_results in config.json as false for both Visualiser and WebVisualiser.
draw_results: "false"
If user needs to save images of visualizer:
Set the value of save_image in config.json as true
"save_image": "true"
Using Labels
In order to have the visualizer label each of the defects on the image, labels in JSON format(with mapping between topic subscribed text to be displayed) has to be provided in config.json(
[WORK_DIR]/IEdgeInsights/Visualizer/config.json) file and run the builder.py([WORK_DIR]/IEdgeInsights/build/builder.py) script using the below command.
   python3 builder.py

An example of what this JSON value should look like is shown below. In this case
it is assumed that the classification types are ``0`` and ``1`` and the text labels
to be displayed are ``MISSING`` and ``SHORT`` respectively.
{
    "0": "MISSING",
    "1": "SHORT"
}
Note
These labels are the mapping for the PCB demo provided in Open EII’s visualizer directory. Currently camera1_stream_results consists of pcb demo labeling and camera2_stream_results consists of safety demo labeling.
Hence, in config.json([WORK_DIR]/IEdgeInsights/Visualizer/config.json) proper mapping of all the subscribed topics should be done with pcb demo labeling and safety demo labeling respectively.
"/Visualizer/config": {
    "save_image": "false",
    "draw_results": "false",
    "labels" : {
        "camera1_stream_results": {
            "0": "MISSING",
            "1": "SHORT"
        },
        "native_safety_gear_stream_results": {
             "1": "safety_helmet",
             "2": "safety_jacket",
             "3": "Safe",
             "4": "Violation"
        },
        "py_safety_gear_stream_results": {
             "1": "safety_helmet",
             "2": "safety_jacket",
             "3": "Safe",
             "4": "Violation"

        },
       "gva_safety_gear_stream_results": {
             "1": "safety_helmet",
             "2": "safety_jacket",
             "3": "Safe",
             "4": "Violation"
        }
    }
}
Metadata Structure
Open EII Visualizer app can decode certain types of mete-data formats for drawing the defects on the image. Any application wanting to use Open EII visualizer need to comply with the meta-data format as described below:
For Ingestor’s Non-GVA type, metadata structure sample is :
{
 "channels": 3,
 "encoding_type": "jpeg",
 "height": 1200,

 "defects": [
     {"type": 0, "tl": [1019, 644], "br": [1063, 700]},
     {"type": 0, "tl": [1297, 758], "br": [1349, 796]}
    ],

"display_info": [{"info":"good", "priority":0}],

"img_handle": "348151d424",
"width": 1920,
"encoding_level": 95
}
where in defects and display_info is a list of dicts.
Each entry in defects list is a dictionary that should contain following keys:
type: value given to type will be the label idtl: value is the top-leftxandyco-ordinate of the defect in the image.br: value is the bottom-rightxandyco-ordinate of the defect in the image.
Each entry in display_info list is a dictionary that should contain following keys:
info: value given will be displayed on the image.priority: Based on the priority level (0, 1, or 2), info will be displayed in either green, orange or red.0 : Low priority, info will be displayed in green.
1 : Medium priority, info will be displayed in orange.
2 : High priority, info will be displayed in red.
For Ingestor’s GVA type, metadata structure sample is :
{
    "channels": 3,
    "gva_meta": [

        {"x": 1047, "height": 86, "y": 387, "width": 105, "tensor": [{"label": "", "label_id": 1, "confidence":0.8094226121902466, "attribute":"detection"}]},

        {"x": 1009, "height": 341, "y": 530, "width": 176, "tensor": [{"label": "", "label_id": 2, "confidence": 0.9699158668518066, "attribute": "detection"}]}

        ],
    "encoding_type": "jpeg",
    "height": 1080,
    "img_handle": "7247149a0d",
    "width": 1920,
    "encoding_level": 95
}
where in gva_meta is a list of dicts.
Note
Any data with in the list, tuple or dict of meta data should be of primitive data type (int, float, string, bool). Refer the examples given above.
Web Visualizer Module
Web Visualizer ia a web based app to view the classified images/metadata coming out of Open Edge Insights for Industrial (Open EII).
Note
In this document, you will find labels of ‘Edge Insights for Industrial (EII)’ for file names, paths, code snippets, and so on. Consider the references of EII as Open EII. This is due to the product name change of EII as Open EII.
Steps to Build and Run Web Visualizer
Refer to the following sections to build and launch Web Visualizer service:
For more details, refer to the Open EII core README
Running WebVisualizer in a browser
WebVisualizer is tested on chrome browser, so it’s recommended to use the Chrome browser.
WebVisualizer currently supports only 6 parallel streams in the Chrome browser per instance.
Running in DEV mode:
- Go to browser
http://< host ip >:5001
Running in PROD mode:
copy ‘cacert.pem’ from ‘[WORK_DIR]/IEdgeInsights/build/Certificates/rootca’ to home directory ‘~/’ and give appropriate permissions to it as shown below:
sudo cp [WORK_DIR]/IEdgeInsights/build/Certificates/rootca/cacert.pem ~
sudo chmod 0755 ~/cacert.pem
Import ‘cacert.pem’ from home Directory ‘~/’ to your Browser Certificates.
Steps to Import Certificates
Goto Settings in Chrome
Search Manage Certificates Under Privacy & Security
Select Manage Certificates Option
Under Authorities Tab Click Import Button
With Import Wizard navigate to home directory
Select cacert.pem file
Select All CheckBoxes and Click Import Button.
- Now in Browser
https://< host ip >:5000
- Login Page
You should use your defined username & password in etcd config.
Note
The admin has to make sure all the necessary config is set in etcd before starting the web visualizer.
Clear the
browsers cachewhile switching fromprodmode todevmode on runningWebVisualizerin browser.
Using Labels
In order to have the web visualizer label each of the defects on the image, labels in JSON format(with mapping between topic subscribed text to be displayed) has to be provided in config.json(
[WORK_DIR]/IEdgeInsights/WebVisualizer/config.json) file and run the builder.py([WORK_DIR]/IEdgeInsights/build/builder.py) script using the below command.
   python3 builder.py

An example of what this JSON value should look like is shown below. In this case
it is assumed that the classification types are ``0`` and ``1`` and the text labels
to be displayed are ``MISSING`` and ``SHORT`` respectively.
{
    "0": "MISSING",
    "1": "SHORT"
}
Note
These labels are the mapping for the PCB demo provided in EII’s web visualizer directory. Currently camera1_stream_results consists of pcb demo labeling and camera2_stream_results consists of safety demo labeling.
Hence, in config.json([WORK_DIR]/IEdgeInsights/WebVisualizer/config.json), mapping of all the subscribed topics has to be done with pcb demo labeling and safety demo labeling respectively.
"/WebVisualizer/config": {
        "dev_port": 5001,
        "port": 5000,
        "labels" : {
            "camera1_stream": {
                "0": "MISSING",
                "1": "SHORT"
            },
            "native_safety_gear_stream_results": {
                "1": "safety_helmet",
                "2": "safety_jacket",
                "3": "Safe",
                "4": "Violation"
            },
            "py_safety_gear_stream_results": {
                "1": "safety_helmet",
                "2": "safety_jacket",
                "3": "Safe",
                "4": "Violation"

            },
            "gva_safety_gear_stream_results": {
                "1": "safety_helmet",
                "2": "safety_jacket",
                "3": "Safe",
                "4": "Violation"
            }

        }
    }
Metadata Structure
Open EII WebVisualizer app can decode certain types of mete-data formats for drawing the defects on the image. Any application wanting to use Open EII WebVisualizer need to comply with the meta-data format as described below:
For Ingestor’s Non-GVA type, metadata structure sample is :
{
 "channels": 3,
 "encoding_type": "jpeg",
 "height": 1200,

 "defects": [
     {"type": 0, "tl": [1019, 644], "br": [1063, 700]},
     {"type": 0, "tl": [1297, 758], "br": [1349, 796]}
    ],

"display_info": [{"info":"good", "priority":0}],

"img_handle": "348151d424",
"width": 1920,
"encoding_level": 95
}
where in defects and display_info is a list of dicts.
Each entry in defects list is a dictionary that should contain following keys:
type: value given to type will be the label idtl: value is the top-leftxandyco-ordinate of the defect in the image.br: value is the bottom-rightxandyco-ordinate of the defect in the image.
Each entry in display_info list is a dictionary that should contain following keys:
info: value given will be displayed on the image.priority: Based on the priority level (0, 1, or 2), info will be displayed in either green, orange or red.0 : Low priority, info will be displayed in green.
1 : Medium priority, info will be displayed in orange.
2 : High priority, info will be displayed in red.
For Ingestor’s GVA type, metadata structure sample is :
{
    "channels": 3,
    "gva_meta": [

        {"x": 1047, "height": 86, "y": 387, "width": 105, "tensor": [{"label": "", "label_id": 1, "confidence":0.8094226121902466, "attribute":"detection"}]},

        {"x": 1009, "height": 341, "y": 530, "width": 176, "tensor": [{"label": "", "label_id": 2, "confidence": 0.9699158668518066, "attribute": "detection"}]}

        ],
    "encoding_type": "jpeg",
    "height": 1080,
    "img_handle": "7247149a0d",
    "width": 1920,
    "encoding_level": 95
}
where in gva_meta is a list of dicts.
Note
Any data with in the list, tuple or dict of meta data should be of primitive data type (int, float, string, bool). Refer the examples given above.
- If user needs to remove the bounding box:
Set the value of draw_results in config.json as false for both Visualiser and WebVisualiser.
```sh
draw_results: "false"
```
ImageStore Module
The Image Store component of Open Edge Insights for Industrial (Open EII) comes as a separate container which primarily subscribes to the stream that comes out of the VideoAnalytics app via MessageBus and stores the frame into minio for historical analysis.
Note
In this document, you will find labels of ‘Edge Insights for Industrial (EII)’ for file names, paths, code snippets, and so on. Consider the references of EII as Open Edge Insights for Industrial (Open EII). This is due to the product name change of EII as Open EII.
The high-level logical flow of ImageStore is as follows:
The messagebus subscriber in ImageStore will subscribe to the VideoAnalytics published classified result (metadata, frame) on the messagebus. The img_handle is extracted out of the metadata and is used as the key and the frame is stored as a value for that key in minio persistent storage.
For historical analysis of the stored classified images, ImageStore starts the messagebus server which provides the read and store interfaces. The payload format is as follows for:
Store interface:
Request: map ("command": "store","img_handle":"$handle_name"),[]byte($binaryImage)
Response : map ("img_handle":"$handle_name", "error":"$error_msg") ("error" is optional and available only in case of error in execution.)
Read interface:
Request : map ("command": "read", "img_handle":"$handle_name")
Response : map ("img_handle":"$handle_name", "error":"$error_msg"),[]byte($binaryImage) ("error" is optional and available only in case of error in execution. And $binaryImage is available only in case of successful read)
Configuration
All the ImageStore module configuration are added into etcd (distributed key-value data store) under AppName as mentioned in the environment section of this app’s service definition in docker-compose.
- If
AppNameisImageStore, then the app’s config would look like as below for
/ImageStore/configkey in Etcd:
"/ImageStore/config": {
    "minio":{
       "retentionTime":"1h",
       "retentionPollInterval":"60s",
       "ssl":"false"
    }
}
Detailed description on each of the keys used
Key |
Description |
Possible Values |
Required/Optional |
|---|---|---|---|
accessKey |
Username required to access Minio DB |
Any suitable value |
Required |
secretKey |
Password required to access Minio DB |
Any suitable value |
Required |
retentionTime |
The retention parameter specifies the retention policy to apply for the images stored in Minio DB. In case of infinite retention time, set it to “-1” |
Suitable duration string value as mentioned at https://golang.org/pkg/time/#ParseDuration. |
Required |
retentionPollInterval |
Used to set the time interval for checking images for expiration. Expired images will become candidates for deletion and no longer retained. In case of infinite retention time, this attribute will be ignored |
Suitable duration string value as mentioned at https://golang.org/pkg/time/#ParseDuration |
Required |
ssl |
If “true”, establishes a secure connection with Minio DB else a non-secure connection |
“true” or “false” |
Required |
For more details on Etcd secrets and messagebus endpoint configuration, visit Etcd_Secrets_Configuration.md and MessageBus Configuration respectively.
InfluxDBConnector Module
InfluxDBConnector will subscribe to the InfluxDB and start the zmq publisher, zmq subscriber threads, and zmq request reply thread based on PubTopics, SubTopics and QueryTopics configuration.
zmq subscriber thread connects to the PUB socket of zmq bus on which the data is published by VideoAnalytics and push it to the InfluxDB.
zmq publisher thread will publish the point data ingested by the telegraf and the classifier result coming out of the point data analytics.
zmq reply request service will receive the InfluxDB select query and response with the historical data.
Configuration
All the InfluxDBConnector module configuration are added into etcd (distributed key-value data store) under AppName as mentioned in the environment section of this app’s service definition in docker-compose.
If AppName is InfluxDBConnector, then the app’s config would look like as below for /InfluxDBConnector/config key in Etcd:
"influxdb": {
        "retention": "1h30m5s",
        "dbname": "datain",
        "ssl": "True",
        "verifySsl": "False",
        "port": "8086"
    }
For nested json data, by default InfluxDBConnector will flatten the nested json and push the flat data to InfluxDB to avoid the flattening of any particular nested key mention the tag key in the config.json(``[WORK_DIR]/IEdgeInsights/InfluxDBConnector/config.json``) file. Currently the defects key is ignored from flattening. Every key to be ignored has to be in a new line.
For example,
ignore_keys = [ "Key1", "Key2", "Key3" ]
By default, all the keys in the data schema will be pushed to InfluxDB as fields. If tags are present in data schema, it can be mentioned in the config.json(``[WORK_DIR]/IEdgeInsights/InfluxDBConnector/config.json``) file then the data pushed to InfluxDB, will have fields and tags both. Currently, no tags are present in the data scheme and tag_keys is kept blank in the config file.
For example,
tag_keys = [ "Tag1", "Tag2" ]
For more details on Etcd secrets and messagebus endpoint configuration, refer to Etcd_Secrets_Configuration.md and MessageBus Configuration respectively.
Working with Edge Video Analytics Microservice
Edge Video Analytics Microservice
This repository contains the source code for Edge Video Analytics Microservice (EVAM) used for the Video Analytics Use Case. For information on how to build the use case, refer to the Get Started guide.
Build the Base Image
Complete the following steps to build the base image:
Run the following command:
`docker-compose -f docker-compose-build.yml build`
If required, download the pre-built container image for Edge Video Analytics Microservice from Docker Hub.
Run the Base Image
Complete the following steps to run the base image:
#. Clone this repo. #.
Run the following command to make the following files executable:
chmod +x tools/model_downloader/model_downloader.sh docker/run.sh
Download the required models. From the cloned repo, run the following command:
./tools/model_downloader/model_downloader.sh --model-list <Path to model-list.yml>
After downloading the models, you will have the
modelsdirectory in the base folder. Refer to the following:models/ ├── action_recognition ├── audio_detection ├── emotion_recognition ├── face_detection_retail ├── object_classification └── object_detection
Add the following lines in the
docker-compose.ymlenvironment if you are behind a proxy.- HTTP_PROXY=<IP>:<Port>/ - HTTPS_PROXY=<IP>:<Port>/ - NO_PROXY=localhost,127.0.0.1
Run the
sudo docker-compose upcommand.
Note
For more details, refer to Run the Edge Video Analytics Microservice.
Run EVAM in Open EII Mode
To run EVAM in the Open EII mode, refer to the README.