Config Manager Agent
Config Manager Agent is an Intel® Edge Insights System service, that is responsible for the following:
Puts the EII services configs to the Intel® Edge Insights System config manager data store
Additionally in PROD mode, generates the following:
Required config manager data store keys/certificates to interact with EII config manager data store like etcd and puts in the volume mounts to be shared with other Intel® Edge Insights System services
Required messagebus keys for Intel® Edge Insights System services communication
Creates required provisioning folders with the right permissions needed for other Intel® Edge Insights System services via volume mounts
Note: Intel® Edge Insights System Certificates will be re-generated everytime the ConfigMgrAgent service brought up By default, the Intel® Edge Insights System Certificates, configs and secrets (etcd certs, zmq keys, pem/der certs) will not be regenerated upon container restarts and if one has to force this recreation, then you have to delete the docker volume by either running
docker compose down -vordocker volume rm edgeinsightssoftware_vol_cma_status_file
docker exec -it ia_configmgr_agent ./scripts/etcd_capture.sh
ETCD UI
Etcd web UI is exposed via the ConfigMgrAgent service. It can be accessed with the following steps. Configuration changes are made for respective EII container services.
Open the browser and enter the address: https://$(HOST_IP):7071/etcdkeeper/ (when EII is running in secure mode). In this case, CA cert has to be imported in the browser. For insecure mode i.e. DEV mode, it can be accessed at https://$(HOST_IP):7071/etcdkeeper/.
Click on the version of the title to select the version of ETcd. By default the version is V3. Reopening will remember user’s choice.
Right-click on the tree node to add or delete.
For secure mode, authentication is required. User name and password needs to be entered in the dialogue box.
Username is the ‘root’ and default password is located at ETCDROOT_PASSWORD key under environment section in docker-compose.yml
This service is accessed from a remote system at address: https://$(HOST_IP):7071 (when EII is running in secure mode). In this case, CA cert has to be imported in the browser. For insecure mode i.e. DEV mode, it is accessed at http://$(HOST_IP):7071
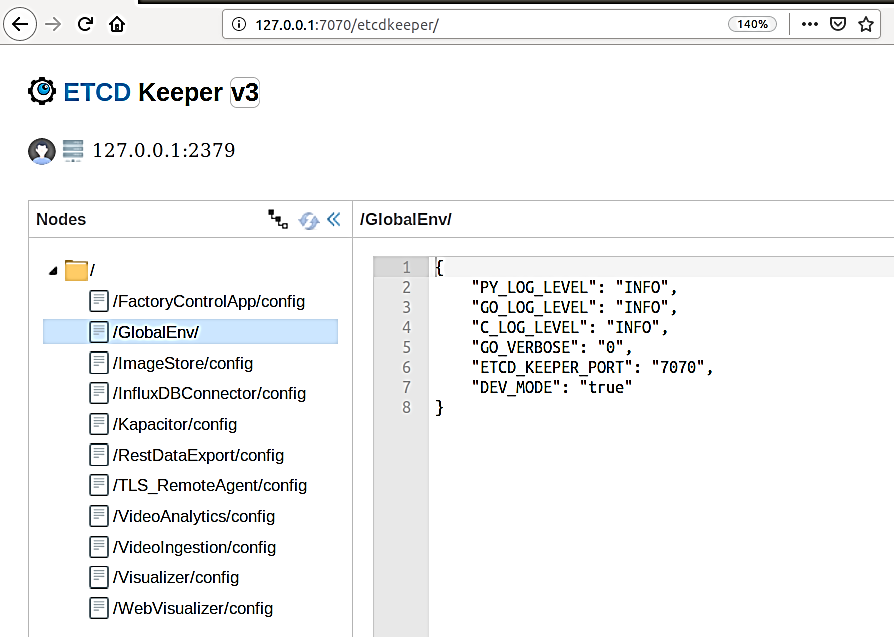
ETCD UI Interface
Note:
If ETCDROOT_PASSWORD is changed, there must be consolidated docker-compose.yml generated using builder script and EII must to be provisioned again. Run the following commands:
cd [WORKDIR]/IEdgeInsights/build
python3 builder.py -f usecases/<usecase.ml>
docker compose up -d ia_configmgr_agent
The ETCD watch capability is enabled for video and timeseries services. It will auto-restart microservices when microservices config/interface changes are done via the EtcdUI interface. Any changes done to these keys are reflected at runtime in EII.
For changes done to any other keys, the EII stack needs to be restarted to be effective. Run the following commands in the working directory, to build or restart EII:
cd [WORKDIR]/IEdgeInsights/build
docker compose down -v
docker compose up -d
Refer prerequisites for video accelerators and prerequisities for cameras before changing the configuration dynamically through ETcdUI.
Steps to Add Self Signed Certificate as Trusted in local Browser
Go to Build Directory of the repo
cd <workdir>/IEdgeInsights/build/Certificates/ConfigMgrAgent/
Download Root CA Cert from the EtcdUI

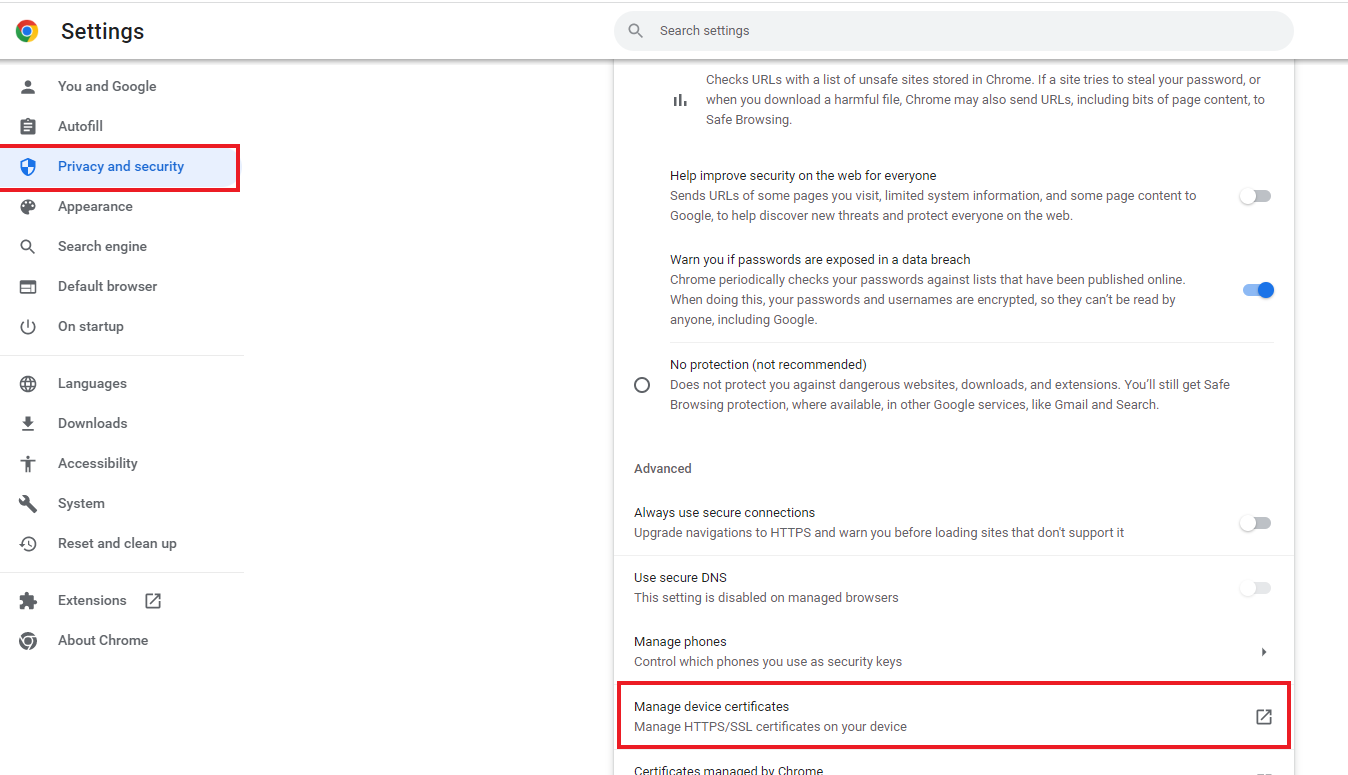
Import the RootCA certificates as Trusted Root Certificate in browser For Chrome Browser, Follow the below steps i. Open Chrome settings, scroll to the bottom, and click Privacy and security ii. Click Manage devices certificates…
 iii. Click the Trusted
Root Certification Authorities tab, then click the Import…
button. This opens the Certificate Import Wizard. Click Next to
get to the File to Import screen. iv. Click Browse… and under
File Type select All Files and select the certificate file you saved
earlier, then click Next.
iii. Click the Trusted
Root Certification Authorities tab, then click the Import…
button. This opens the Certificate Import Wizard. Click Next to
get to the File to Import screen. iv. Click Browse… and under
File Type select All Files and select the certificate file you saved
earlier, then click Next.  v. Select Place all
certificates in the following store. The selected store should be
Trusted Root Certification Authorities. If it isn’t, click
Browse… and select it. Click Next and Finish vi. Click
Yes on the security warning. vii. Restart Chrome.
v. Select Place all
certificates in the following store. The selected store should be
Trusted Root Certification Authorities. If it isn’t, click
Browse… and select it. Click Next and Finish vi. Click
Yes on the security warning. vii. Restart Chrome.